Thursday, June 30, 2011

Glow Sticks


Today’s activity didn’t work out as planned.  The plan is to create a glow-in-the-dark bean-bag toss.  The glow sticks that I bought are great!  As you can see from the picture below, they really do glow in the dark.  They come with connectors, so you can make them into circles.  I’m not sure what they’re filled with, so I wouldn’t recommend them for every day play.  We're going to keep them for “outside” games. 
Now, for the bean-bags (sigh).  The glow-in-the-dark fabric pen did not work.   The glow-in-the-dark paint was absorbed into the fabric, and barely worked.  Tomorrow, I'm going to put a heavier layer of paint on the fabric and let the painted fabric sit in the sun to “charge”. 
I’ll let everyone know how this works out.   

I bought the Glow Sticks at 5 Below, $5.00.
 I am always open to suggestions, blog@klinecreative.com.

Wednesday, June 29, 2011

July 4th Berry Biscuit Tarts


This super-easy recipe is great for a party, or for any weekday!

July 4th Berry Biscuit Tarts

4 c. spelt flour (you can use regular flour, you might need to use a little more) + a little extra for the counter and the cup
2 Tbsp. Baking powder
1 tsp. salt
½ c. sugar + extra for sprinkling ( I use turbinado sugar, you can use any kind)
2/3 c. canola oil
1 ½ c. warm water
1 Tbsp. honey
1 16 oz. container strawberries, washed and sliced
1 11 oz. container blueberries, washed (we had extra blueberries, a smaller container would work)
* ½ c. heavy cream

Pre-heat oven to °375.
In a large bowl, whisk together the dry ingredients.  In a smaller bowl, whisk together the canola oil, warm water and honey.  Save the cream for later.  Pour the wet ingredients into the dry ingredients, and stir to combine.  Don’t overwork it, just stir until it comes together.
Put a little bit of flour on a clean counter.  Dump the dough onto the flour.  The dough will be really moist.  Fold and turn the dough around in the extra flour.  Press the dough out with your fingers, to about 1’’ thickness.  Dip the top of a cup, or mug, in a little flour.  Press the cup into the dough, and make biscuits.
**Take the biscuits, one at a time, and press out to about ½’’ thickness.  Place berries in the middle of the circle, leaving room around the edge.  Fold the edges of the dough over the berries. 
Place on a parchment lined baking sheet, brush the dough with heavy cream and sprinkle with sugar.
Bake for 8-10 minutes, turning halfway through.
These can be eaten warm, with a fork.  Or, let cool completely and pick them up (works better at a cook-out).
Makes 10 – 12 tarts.     

*- the heavy cream is optional
** - sometimes it’s easier to spread out the individual biscuits right on the parchment lined baking sheet

These are delicious plain, but they are also great with a little whipped cream or drizzled with honey. 

To make whipped cream just beat some heavy cream in a metal bowl.  When the cream starts to stiffen add confectioners sugar, to taste.  If you like you can also add vanilla, almond extract or even a little liqueur. 
By the way, if you stick the metal bowl and beaters in the freezer first, the cream will whip a little quicker.   


Tuesday, June 28, 2011

Pinwheels

This one took a few tries, but the end result was great.  Hopefully, I have worked out the kinks for you.  You will need:
paper (a piece of printer paper is what we used, but get fancy if you like)
scissors
thumb tacks, push pins, straight pins or something like these
crayons, markers and any additional decorating material
un-sharpened pencils with long, firm erasers

Gently bend a piece of paper in half.  You don't actually want to crease the paper all of the way, you are only making a guide-line.  Take the folded paper, and gently bend it in half.  Unfold, and cut along the light guide-lines.
After cutting, you will have 4 quarters of paper.  Take one quarter, and follow the same bending process, except don't cut yet.  Bend the quarter in half, then again.  The light creases will show you the center of the paper.
Take the quarter, and cut from a corner of the paper into the center.  You don't want to go all the way to the center, imagine a circle in the center that is about 1 1/2'' to 2'' and stop at the edge of that circle.  Start at each corner, and repeat.  You will end up with 4 triangles, connected by a circle in the center of the paper.
Decorate the quarters that have been cut to "almost" the center.
Take the edge of a triangle on the quarter, and bend the paper toward the center.  Skip the other side of the triangle.  Go to the next edge, and repeat.  Every other edge will be gently bent toward the center.
Hold the corners together at the center of the paper, and push a tack (or whatever device you are using) through the bent corners and the center.
Then, push the tack into the side of a pencil eraser.
Ta- dah, pinwheel.

What I learned:
if the pinwheel is leaning against the pencil, it will not work well,
if the paper is "folded" instead of "bent" it might not work well,
if the tack is pushed in too far (to the eraser), it will be slow,
if the tack is not pushed in enough, the wheel will fly off the pencil,
there are small materials involved (tacks), so watch the kids closely,
if the pencil does not have a firm, fully-intact eraser, the wheel will not hold.


By the way, if you use left-over red holiday paper for the pinwheels - "hello", 4th of July!  Or, make little pinwheels with patriotic colored paper, stick them in a vase filled with patriotic-colored rocks or marbles, tie left-over red holiday ribbon around the vase - "hello", 4th of July centerpieces! 

Please let me know how this worked for you.  Contact me at, blog@klinecreative.com.  Have fun!

Monday, June 27, 2011

Leaf Transfers

This one can be done using a variety of materials.  My husband did this with our kids, they used -

crayons (with the paper pealed off)
paper
a leaf

Put the leaf under the paper (bottom side up), turn the crayon on its side and color over the leaf.  Continue moving the leaf (under the paper), and coloring.  Experiment with different leaves.  A million varieties of patterns can be made.  Have fun!


Friday, June 24, 2011

Bubbles!

Homemade bubbles, anytime.  Here is the original solution:
1/2 c. corn syrup
2c. dishwashing liquid
5 c. warm water
Combine.

But, I only had 1/2 c. of dishwashing liquid in the house.  And, I didn't realize it until I started pouring the dishwashing liquid.  The corn syrup was already in the bowl.
Here is the solution that I used:
1/2 c. corn syrup
1/2 c. dishwashing liquid
2 1/2 c. warm water

We whisked the ingredients in a bowl.  We took the bowl of soap, a baking dish, a slotted spoon, a spatula with holes and a plastic child's clothing hanger outside. 
Using the bowl, the results were not great.
We poured the solution into the baking dish, dipped the hanger and "ta-dah" - success!

I recommend doing this in the grass.  On the patio, the bubbles left a little "trace of soap".  Any "trace of soap" was easily cleaned with the hose.

The materials.  The bowl was good for mixing, the baking-dish was the choice for "bubble production".

Dip the hanger.

When you lift the hanger, you will see the soapy film in opening.

Gently move the hanger through the air.

The grown-ups loved this one too!


Have fun!  Please let me know how your adventure turned out.  E-mail me at blog@klinecreative.com.


Wednesday, June 22, 2011

Party Hats

What you will need:  large paper, stapler, tape, decorating stuff (markers, crayons, glitter, whatever you have around).

Today happens to be my birthday (yeah!), but party hats are always fun.  Why not wear a party hat to dinner on any given Wednesday?
We started with poster-board.  You can use smaller paper, just make a chin strap.  A little ribbon, a couple pieces of tape - party hat!  If you're really feeling fancy, you can use some kind of material.
Draw a circle on the paper.  Then, make a little dot in the center of the circle.  Draw a line that extends from the little dot, to the outer edge of the circle.  Cut along the line.  At this point we had to make decisions about hat size.  Once you've decided how large you need the hat, cut another line extending from another exterior point to the little circle.  Now you'll have a pizza-wedge size stray piece of paper, and a larger piece that is the beginning of a hat.
Roll the larger piece into a cone shape, and make a mark so that you'll know where to stop decorating (where the paper will overlap after stapling).  Then, go to town decorating!  Our hats were pretty simple; markers, crayons, ribbon and some glitter glue (by the way, they're not joking about the word "glue").  We taped ribbon onto the top of the hat.  Glue was not our friend today.  
Roll the hat into a cone, and staple.  Party hat!


Please send me your awesome party hat photos, blog@klinecreative.com. Have fun!

Tuesday, June 21, 2011

Have Your Cake and Eat the Batter Too (eggless)

Today my son announced that one of his stuffed animals was having a birthday.  I was not prepared, but I do love cake.  Any reason to bake a cake, right?  So, I went along.  Fortunately, I have a super-easy basic cake recipe.  You probably have the ingredients in your kitchen right now.

The best part - there are no eggs in this recipe!  Kids can help, and are encouraged to lick the bowl. 

This is a plain cake, but it's tasty and can be "dressed up" in ways I'm sure I haven't thought of yet.  In this case, I ran out of sugar and used 1c. brown sugar with 1 cup regular sugar, (Please keep in mind that I am not a chef.  So, I use words like "regular sugar").  Anyway, the only thing I had to "dress up" the cake was a half bag of chocolate chips.  The other half of the bag mysteriously disappeared one night.  I have no idea how that happened!  After we put the batter in the pan, we sprinkled the chips over the batter.

Here is the recipe -

Christine’s Vanilla Cake Base

3 ¾ c. flour 
2 tsp. baking soda
2 c. sugar
1 tsp. salt

1 ¼ c. melted unsalted butter
2 1/3 c. warm water
2 Tbsp. vinegar
2 Tbsp. vanilla

Pre-heat oven to °350, and grease a bundt pan.

In a large bowl, whisk together dry ingredients.  To the melted butter add water, vinegar and vanilla.  Pour wet ingredients into dry ingredients, and stir well.

Pour batter into pan, and bake for 28 – 32 minutes or until toothpick comes out clean. 

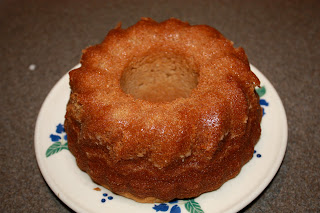
I have a really hot oven, so it may take a little longer.  Also, my bunt pan is on the small side.  I had extra batter, so I made another small cake.  This cake can also be made into a 2 layer round cake.  We'll have to try cupcakes and let you know.  I'll consult my "cupcake expert" and let everyone know.

My son helping out with the cake.


Yum!


Let the cake cool for about 20 minutes.  Went around the sides with my miniature-flat-metal-icing-spreader (I told you I wasn't a chef).  Put a plate on the top - flipped it - said a little prayer- and tadah!

The extra little cake.  No chocolate chips, still good.


Please let me know how this works out for you.  If you have ideas or suggestions, please send them to me.  Have fun!